11 Modern Gardening And Landscaping Ideas
A beautiful yard is no longer just about keeping the grass trimmed and adding a few flower pots near the porch. For many homeowners across the USA, the outdoor space has become an extension of the home itself: a place to cook, relax, entertain, grow food, enjoy quiet mornings, and create a view that feels…
A beautiful yard is no longer just about keeping the grass trimmed and adding a few flower pots near the porch. For many homeowners across the USA, the outdoor space has become an extension of the home itself: a place to cook, relax, entertain, grow food, enjoy quiet mornings, and create a view that feels calm from the kitchen window. That shift is exactly why Modern Gardening feels so fresh right now. It blends clean design with practical living, making outdoor areas feel useful, stylish, and easier to maintain.
The best part is that you do not need a huge backyard or a luxury budget to create a polished landscape. A small patio, narrow side yard, suburban lawn, townhouse deck, or front entry can all become more intentional with the right layout choices. Think simple lines, layered plants, natural textures, defined zones, and materials that age gracefully in real weather. These ideas are especially helpful for busy families, first-time homeowners, renters with container spaces, and anyone who wants a yard that looks current without becoming high-maintenance.
In my experience, the most successful outdoor makeovers start with one clear decision: how you want the space to feel and function. Do you want a peaceful coffee corner, a low-water planting bed, a backyard dining area, or a dramatic walkway that improves curb appeal? Once that purpose is clear, the design becomes easier. The following ideas focus on practical upgrades that look great in photos, work well for everyday life, and fit many American home styles, from craftsman bungalows to new-build suburbs and modern farmhouses.
Part 1 covers the first six landscaping ideas, with practical styling notes and real-life layout guidance. Image prompts, slug, and meta description are intentionally saved for Part 2, following your format rules.
For Pinterest readers, the strongest outdoor ideas usually have two qualities: they look clear in a photo and they solve a real problem. A gravel corner can fix a muddy patch. A raised bed can make food gardening feel less overwhelming. A vertical planter can turn a blank fence into a layered backdrop. A fire pit can help a backyard become useful after sunset. This article is written with that balance in mind, so every section includes visual direction, material logic, and simple choices that can help a homeowner move from inspiration to action without feeling lost at the garden center. The goal is not to chase a perfect showroom yard. The goal is to create outdoor moments that feel calm, useful, and personal: a cleaner path to the side gate, a prettier view from the breakfast table, a place to sit while kids play, or a low-care planting bed that still changes beautifully with the seasons. When a design supports everyday routines, it becomes more than decoration. It becomes part of how the home lives. Even small choices, like repeating one planter color or replacing a weak lawn strip with gravel, can make the entire property feel more cared for. Those modest upgrades often photograph well, but more importantly, they make outdoor chores and outdoor relaxing feel easier to enjoy.
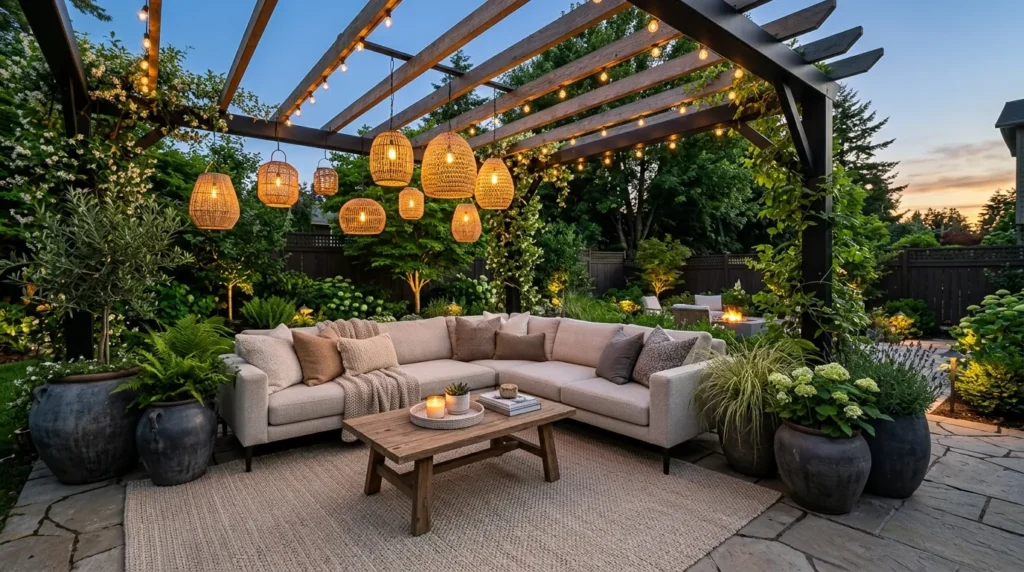
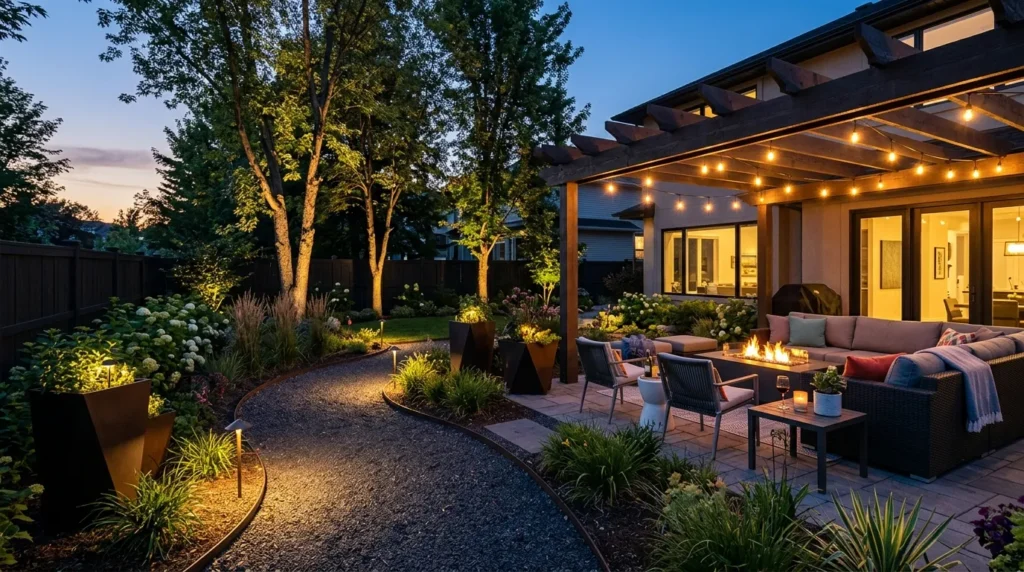
1. Outdoor Rooms
Bullet Points:
- Define the space with a pergola, shade sail, large outdoor rug, paver pad, or gravel base so the area reads as a true room rather than random furniture placed on the lawn. This small boundary gives the eye a stopping point and helps guests understand exactly where to gather.
- Use furniture that matches the way your household actually relaxes, such as a sectional for family movie nights, a round dining table for hosting, or two lounge chairs for a quiet coffee corner. The best layout is not always the fanciest one; it is the one people will naturally use.
- Repeat exterior colors through cushions, planters, throw pillows, lanterns, and wood tones so the outdoor room feels connected to the house instead of looking like a separate design style. Pulling one color from the siding, trim, or front door can make the whole yard feel more cohesive.
- Add practical comfort with side tables, outdoor storage, layered lighting, and washable fabrics, especially in climates with pollen, summer storms, strong sun, or kids and pets moving through the space. Pretty pieces matter, but durability is what keeps the room looking good after real daily use.
- Keep the layout open enough for people to walk behind chairs, carry food from the kitchen, and move between the patio, garden beds, grill, and lawn without awkward traffic patterns. A beautiful outdoor room quickly becomes frustrating when every path feels tight or blocked.
An outdoor room instantly makes a backyard feel planned instead of leftover. The idea works because it gives your open space a clear purpose, whether that is dining, lounging, reading, or gathering around a small table after dinner. Use a pergola, pavers, outdoor rug, gravel pad, or low planting border to define the zone without building walls. I’ve seen this work well in many homes because it turns plain lawn into a destination, especially when the furniture layout feels as intentional as an indoor living room, not outdoor storage.
The transformation is strongest when the area connects naturally to the house. Place the room near a kitchen door, sliding glass door, or shaded corner so it feels easy to use, not like a faraway feature. Choose weather-resistant seating, washable cushions, a simple coffee table, and planters that repeat colors from your home’s exterior. For usability, leave enough walking space around furniture and avoid blocking garden paths. The result is a backyard that feels polished, comfortable, and ready for weeknight meals or weekend hosting, even in ordinary neighborhoods today.
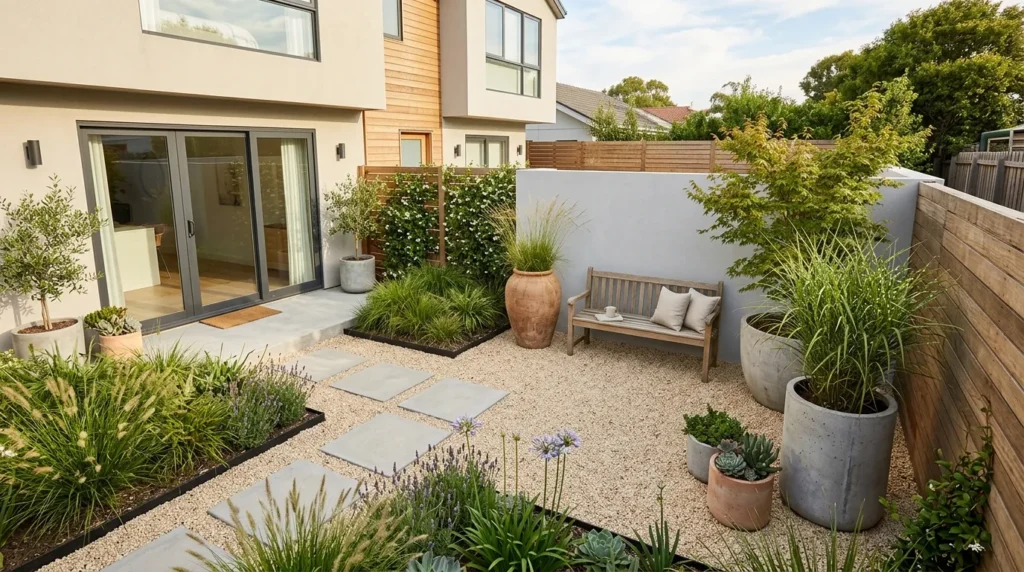
2. Gravel Courtyards
Bullet Points:
- Choose pea gravel for a softer casual look, decomposed granite for a smoother compacted surface, or crushed stone for a sharper contemporary texture that holds up well in high-traffic zones. The material should match the home’s style, but it should also feel comfortable under shoes and furniture legs.
- Use steel, brick, stone, concrete, or composite edging to keep the gravel contained, protect nearby lawn areas, and create the crisp outline that makes the courtyard feel designed. Without edging, gravel tends to migrate into grass and beds, which can make the space look unfinished.
- Layer the area with oversized planters, sculptural grasses, ceramic pots, or low shrubs so the stone surface does not feel empty, flat, or too harsh in bright sunlight. Plants soften the mineral texture and give the courtyard the warmth that makes people want to sit there.
- Place stepping stones where people naturally walk, especially from the back door to seating, from seating to the grill, or from the driveway to a side entry. These stones create rhythm, reduce gravel displacement, and make the area easier for guests, children, and older family members to navigate.
- Consider gravel for awkward spaces such as narrow side yards, shaded lawn patches, small front courtyards, rental patios, and corners where a full poured patio would feel too expensive. It is one of the most forgiving materials because the shape can be changed later if your layout evolves.
Gravel courtyards bring that clean, architectural look without the cost of a full patio. They work beautifully because gravel creates texture, drainage, and structure at the same time, especially in areas where grass struggles or water pools after storms. Pea gravel, decomposed granite, or crushed stone can frame seating, raised planters, sculptural grasses, and stepping stones. That’s why many designers recommend gravel for smaller yards: it makes a simple area feel styled while still being flexible, affordable, and easy to adjust later when your needs change seasonally at home.
For the best everyday results, treat gravel like a real surface, not a temporary filler. Start with landscape fabric or a compacted base, add sturdy edging, and keep the depth even so chairs do not sink awkwardly. Pair the courtyard with metal planters, concrete pavers, warm wood benches, or drought-tolerant plants for a crisp but welcoming feel. A small bistro set, fire bowl, or water bowl can finish the space. It becomes a low-care retreat that looks especially beautiful in morning light and golden evening shade every day outside beautifully.
3. Raised Beds
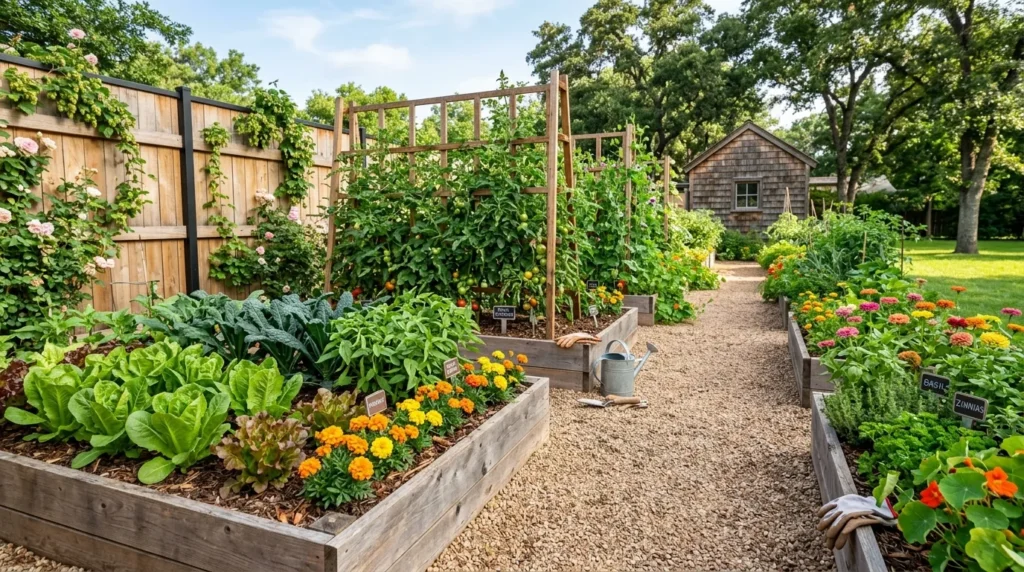
Bullet Points:
- Use cedar for a warm natural look, galvanized metal for a farmhouse-modern style, stone for permanence, or composite boards for a clean option that can resist moisture longer. The bed material becomes part of the landscape, so choose something that complements fences, patios, siding, and nearby furniture.
- Plan the bed placement around sunlight first, then think about beauty, because vegetables, herbs, and many cutting flowers need strong light to perform well through the season. A pretty bed in deep shade may photograph nicely at first, but it will not produce the same satisfying results.
- Keep beds narrow enough to reach the center from either side, which reduces stepping into soil and makes watering, pruning, planting, and harvesting much easier. For many home gardens, a width around three to four feet feels comfortable, especially when paths run along both sides.
- Mix edibles with flowers like marigolds, calendula, nasturtiums, lavender, or zinnias to make the beds prettier while supporting pollinators and giving the garden a fuller Pinterest-friendly look. This mix also keeps the space from looking bare between harvests because blooms continue carrying the visual interest.
- Finish the surrounding paths with gravel, mulch, brick chips, or stepping stones so the whole garden feels clean, accessible, and attractive even before peak growing season arrives. Good paths also reduce muddy shoes, define the layout, and make quick morning watering feel much easier.
Raised beds make a garden feel organized before anything even grows. Their biggest strength is structure: they create clean lines, improve soil control, and make planting easier on the back and knees. Cedar, galvanized steel, composite boards, or stone blocks can all work, depending on the home’s style and budget. In my experience, raised beds are one of the most practical upgrades for American yards because they blend beauty with productivity, especially when vegetables, herbs, flowers, and pollinator plants are mixed together thoughtfully in repeating seasonal patterns near pathways.
The finished look depends on spacing, repetition, and access. Leave paths wide enough for a wheelbarrow, use gravel or mulch between beds, and keep the bed height comfortable for planting and harvesting. Add trellises for tomatoes, cucumbers, beans, or climbing flowers to bring vertical interest into the layout. For a cleaner appearance, repeat one material and keep plant labels simple. The space becomes easier to maintain, more attractive from the patio, and more useful for families who want fresh herbs, seasonal vegetables, and flowers close to home year-round with less stress.
4. Native Borders
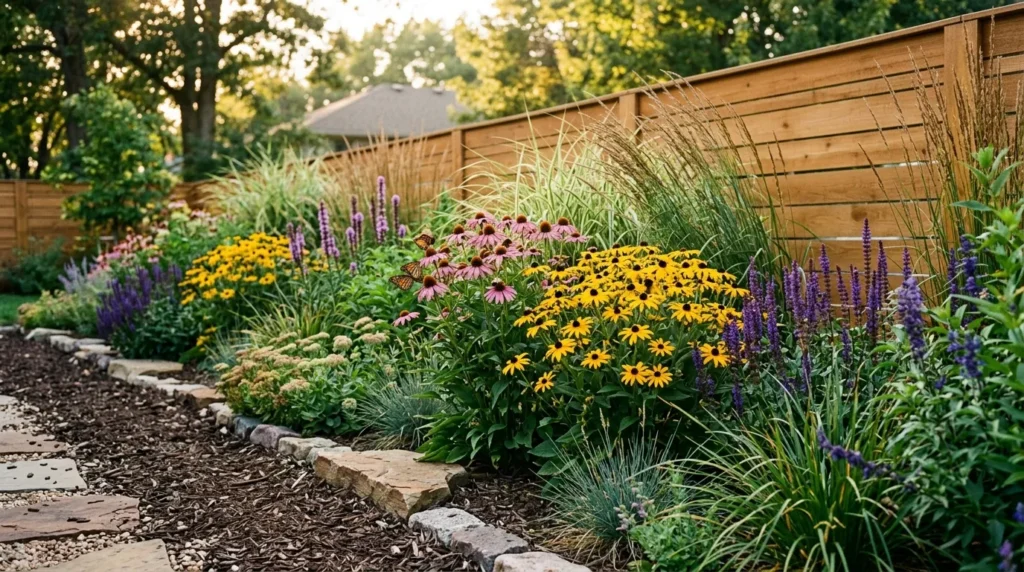
Bullet Points:
- Start with plants that match your USDA growing zone, rainfall patterns, and soil type, because regional suitability matters more than copying a garden from a completely different state. A plant that thrives in Oregon may struggle in Texas, so local nurseries and extension resources are helpful starting points.
- Repeat plants in groups of three, five, or seven instead of scattering single plants everywhere, which helps the border look intentional, full, and easier to read from a distance. Repetition creates calm, while too many unrelated plants can make even expensive landscaping feel cluttered.
- Combine different heights, bloom times, seed heads, foliage colors, and grass textures so the border offers interest in spring, summer, fall, and even quiet winter months. A strong border is not only about flowers; stems, leaves, movement, and seed heads all contribute to the scene.
- Use mulch, stone, or low edging during the early years to keep the bed tidy while young plants fill in and roots become stronger. Many native plantings need patience at first, but a clean edge reassures the eye that the garden is intentional, not neglected.
- Place native borders along fences, driveways, walkways, patios, or front foundations where they can soften hard lines and make a home feel more settled into its landscape. These borders can also guide movement, frame views, and reduce the amount of lawn that needs mowing.
Native borders give a yard movement, color, and ecological purpose without looking messy. They work because native plants are adapted to local climate patterns, regional soils, and familiar wildlife needs, which can make them more resilient once established. A border filled with coneflowers, black-eyed Susans, switchgrass, salvia, little bluestem, or regional shrubs can soften fences and frame walkways beautifully. I’ve noticed that these plantings look best when they are arranged in repeated drifts instead of scattered singles, creating a natural but intentional rhythm across the landscape edge beautifully through every season.
The key is choosing plants for your specific region, not copying a garden from a different climate. A Midwest border may need prairie grasses and hardy perennials, while a Southwest yard may lean into agave, yucca, sage, and gravel mulch. Place taller plants in the back, medium bloomers through the middle, and low edging plants near paths. Add mulch for the first seasons while roots establish. Over time, the border feels alive, layered, and easier to care for than a thirsty strip of high-maintenance lawn behind the house comfortably after heavy rain.
5. Vertical Greenery
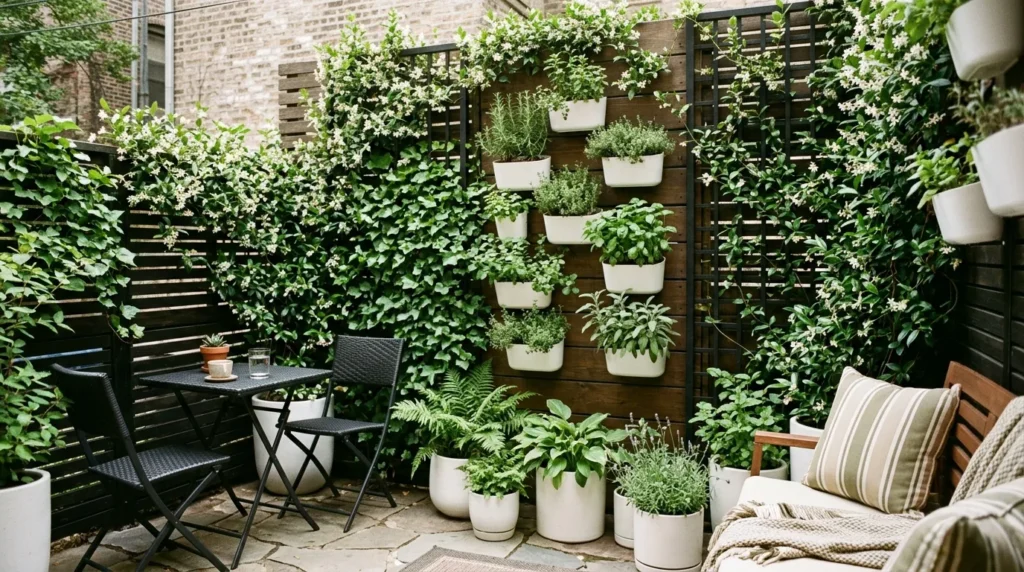
Bullet Points:
- Use trellises, wall grids, hanging rails, fence planters, narrow shelving, or privacy screens when ground space is limited but the outdoor area still needs softness and height. Vertical pieces are especially powerful behind a seating area because they create a backdrop without stealing square footage.
- Match the plant choice to the sun exposure, because a hot west-facing wall needs tougher plants than a shaded balcony or a protected courtyard fence. Before buying anything, watch the space for a full day and note where afternoon heat, reflected light, and wind hit hardest.
- Grow climbing flowers, trailing herbs, compact ferns, ivy, jasmine, clematis, or seasonal annuals depending on your climate, maintenance style, and desired color palette. Herbs are useful near outdoor kitchens, while flowering vines can soften blank fencing and make a small patio feel more romantic.
- Install drip irrigation, self-watering planters, or a simple watering schedule so vertical installations do not dry out quickly during hot American summers. Containers mounted on walls often lose moisture faster than ground beds, so watering convenience should be part of the design from the beginning.
- Use vertical planting behind seating, near dining zones, along blank fences, or beside entry doors to create a lush background that photographs beautifully for Pinterest. Even one narrow green wall can make a patio feel more private, finished, and inviting from inside the home.
Vertical greenery is perfect when the ground space is limited but the design needs height. It works on patios, balconies, side yards, fences, and small backyards because it pulls the eye upward and makes a compact area feel lush. Wall planters, trellises, privacy panels, climbing vines, hanging rails, and narrow plant shelves can all add layers without crowding the floor. This approach is especially useful for townhouse owners and renters who want visual impact while keeping pathways, seating, and doorways open for everyday movement outside comfortably beautifully in tight spaces.
To keep the design manageable, choose a system that matches your watering habits. Pocket planters need consistent moisture, while trellised vines and large wall-mounted containers are often easier to maintain. Try jasmine, clematis, climbing roses, star jasmine, herbs, trailing ivy, or compact annuals depending on sunlight and climate. Use drip irrigation or self-watering containers if the wall gets hot afternoon sun. The result is a softer fence, a prettier patio backdrop, and a garden that feels layered even when the footprint is only a few feet wide visually from every angle.
6. Fire Pit Gardens
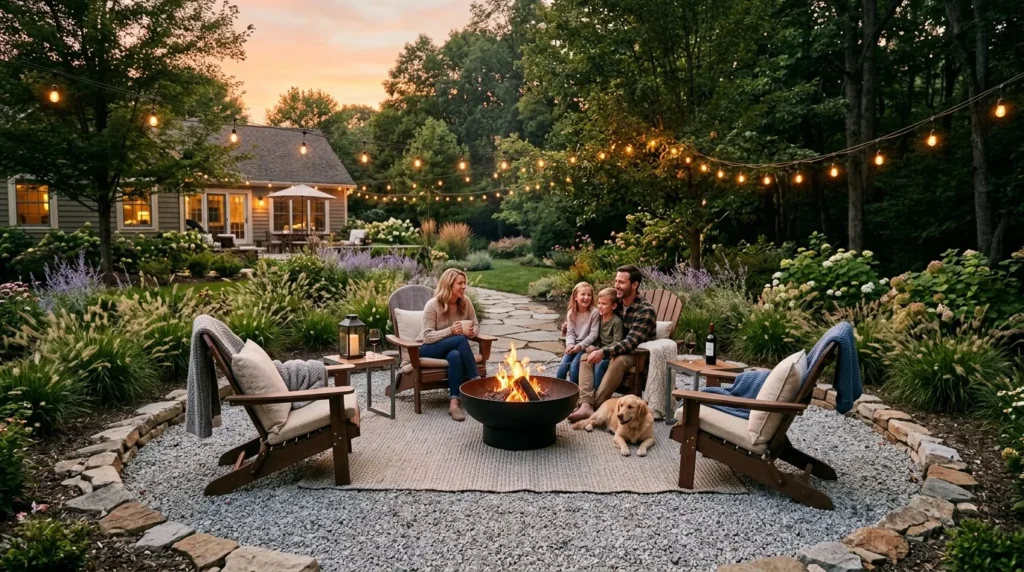
Bullet Points:
- Choose the fire feature first, whether built-in stone, steel bowl, gas fire table, or smokeless portable pit, because the size determines the seating circle and safe clearances. A smaller yard may need a compact model, while a wide suburban backyard can handle a larger destination zone.
- Build the base with gravel, concrete pavers, flagstone, or compacted stone dust to reduce mud, improve stability, and create a fire-safe surface underfoot. The ground plane matters because chairs should sit evenly, feet should stay clean, and the space should still look attractive between uses.
- Use movable chairs instead of fixed benches if your household hosts different group sizes, because flexible seating makes the space more comfortable for casual nights and gatherings. Adirondack chairs, metal lounge chairs, or weatherproof woven seats all work when they can be shifted easily.
- Add side tables, outdoor blankets, lanterns, and storage for fire tools so the area feels ready to use without carrying everything outside each time. These small conveniences make the difference between a feature that looks nice and a destination your family actually enjoys.
- Frame the zone with grasses, evergreen shrubs, stone borders, or low planters, while keeping flammable materials far enough away for safety and easier maintenance. Soft planting around the outside creates atmosphere, but clear space near the flame keeps the layout responsible and comfortable.
A fire pit garden creates a natural gathering point that makes the yard feel useful beyond daylight hours. The idea works because it combines warmth, seating, lighting, and atmosphere in one defined space. Whether you choose a built-in stone pit, a smokeless metal model, or a simple portable bowl, the surrounding layout matters just as much as the fire feature. Add gravel, pavers, Adirondack chairs, low grasses, and sturdy side tables to make the zone feel finished rather than dropped into the lawn at random beautifully in family backyards.
Safety and comfort should guide every detail. Keep the pit away from fences, overhanging branches, dry mulch, and structures, and always follow local rules for open flames. Use nonflammable surfaces underneath, choose chairs that are easy to move, and leave enough room for people to walk behind seating. For a softer look, surround the area with ornamental grasses, stone edging, solar path lights, or evergreen shrubs. It becomes a cozy destination for fall evenings, casual conversations, marshmallow roasting, and relaxed weekend nights at home with friends comfortably during cooler months.
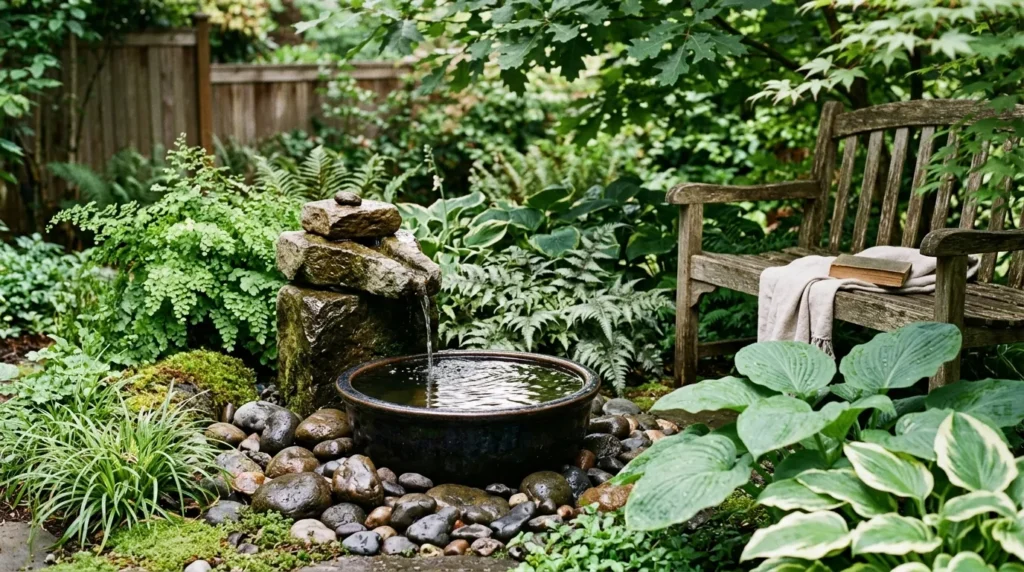
7. Water Features
Bullet Points:
- Add a small fountain, bubbling urn, wall spout, or compact pond to bring movement, sound, and a calm focal point into the yard.
- Use stone, ceramic, concrete, metal, or river rock so the water feature feels connected to the rest of the landscape.
- Place it near a seating area, porch, window, or pathway where the relaxing sound can actually be enjoyed.
- Surround the base with ferns, grasses, hostas, or low lighting to make the feature look finished and natural.
- Keep the size realistic for maintenance, especially for family homes, small patios, and busy homeowners.
Water features bring instant calm because they add sound, movement, and reflection to an outdoor space. A small fountain, bubbling urn, wall spout, or narrow pond can make even a simple patio feel more finished and peaceful. The best designs do not need to be oversized; they need to match the scale of the yard. I’ve noticed that compact water features often work better for American homes because they are easier to clean, safer around children, and more realistic for busy homeowners who want beauty without constant maintenance during ordinary weeks too.
Placement matters because a water feature should be seen and heard where people naturally spend time. Position it near a seating area, porch, bedroom window, or garden path so the sound becomes part of daily life. Use stone, ceramic, concrete, metal, or river rock to connect it with the rest of the landscape. Add shade-loving plants, grasses, or low lighting around the base for softness. The final result feels polished, refreshing, and relaxing, especially during warm evenings when gentle water sound makes the garden feel cooler and more private outside.
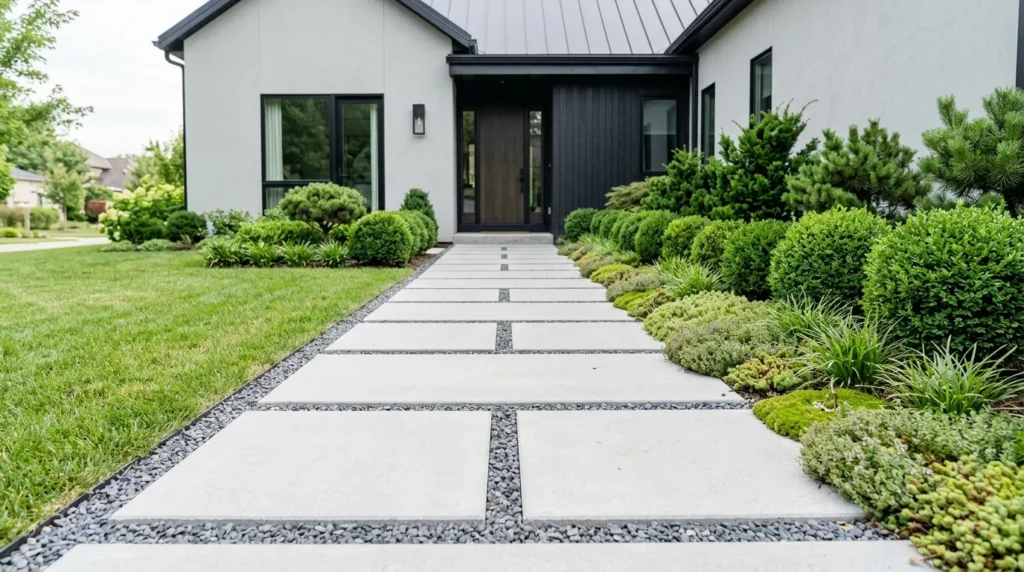
8. Minimalist Pathways
Bullet Points:
- Use concrete slabs, gravel, brick, flagstone, or stepping stones to create a clean route through the yard.
- Keep the shape simple and the spacing consistent so the path feels intentional instead of crowded.
- Follow the natural walking pattern your family already uses before choosing the final layout.
- Add low plants, gravel joints, edging, or solar lights to soften the path without making it look busy.
- Choose slip-resistant materials for areas with rain, snow, or heavy everyday foot traffic.
Minimalist pathways make a yard feel organized because they guide the eye and create a clean sense of direction. Instead of letting people walk randomly through grass or muddy areas, a defined path connects important zones like the driveway, front door, patio, garden beds, and side gate. Large concrete slabs, stone pavers, gravel joints, brick strips, or stepping stones can all work beautifully. The strongest designs use simple shapes and repeated spacing so the path feels intentional rather than busy, especially in front yards where curb appeal matters immediately today.
For a practical layout, follow the route people already use before installing materials. If your family cuts across the lawn to reach the garage, shed, or backyard gate, that natural line is probably where the path belongs. Keep the width comfortable, add edging where gravel is used, and choose slip-resistant surfaces for rainy or snowy climates. Low groundcover, boxwood, ornamental grass, or solar lights can soften the edges. A clean pathway improves movement, reduces lawn wear, and gives the whole yard a more custom-designed appearance with everyday function too easily.
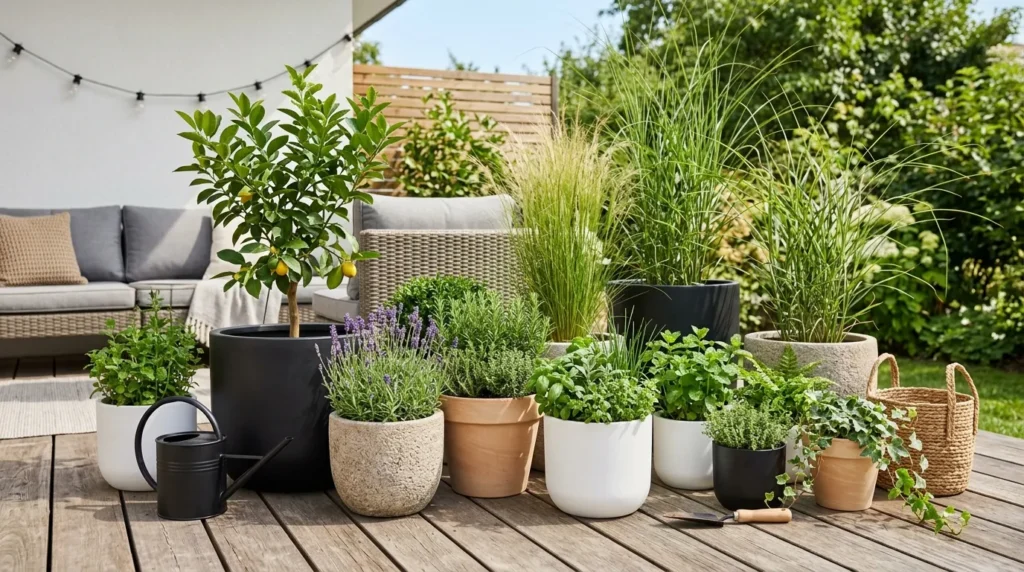
9. Container Clusters
Bullet Points:
- Group planters in different heights to create a fuller garden look on patios, porches, decks, and balconies.
- Keep container colors controlled, such as terracotta, matte black, white ceramic, or stone gray.
- Use one tall anchor plant, several medium fillers, and trailing plants to create layered visual interest.
- Choose plants based on sun exposure, watering needs, and seasonal color changes.
- Use quality potting soil, drainage holes, and matching saucers to keep the setup clean and healthy.
Container clusters are powerful because they create a garden anywhere, even without planting beds. A patio, porch, balcony, deck, driveway edge, or rental backyard can feel lush when pots are grouped with intention. The secret is mixing heights, textures, and plant shapes while keeping the container colors controlled. Use one main palette, such as terracotta, matte black, white ceramic, or stone gray, then vary the sizes. This approach keeps the look stylish instead of cluttered and works especially well for seasonal decorating in smaller spaces across the home beautifully today.
To make container groupings look professional, start with a tall anchor plant, add medium fillers, then finish with trailing plants around the edges. A small citrus tree, ornamental grass, hydrangea, lavender, rosemary, coleus, or trailing sweet potato vine can create strong layers. Place the largest pot toward the back or center and smaller pots around it for balance. Use quality potting mix, drainage holes, and matching saucers where needed. The result is flexible, colorful, and easy to refresh when seasons change or plants outgrow their containers over time naturally outside.
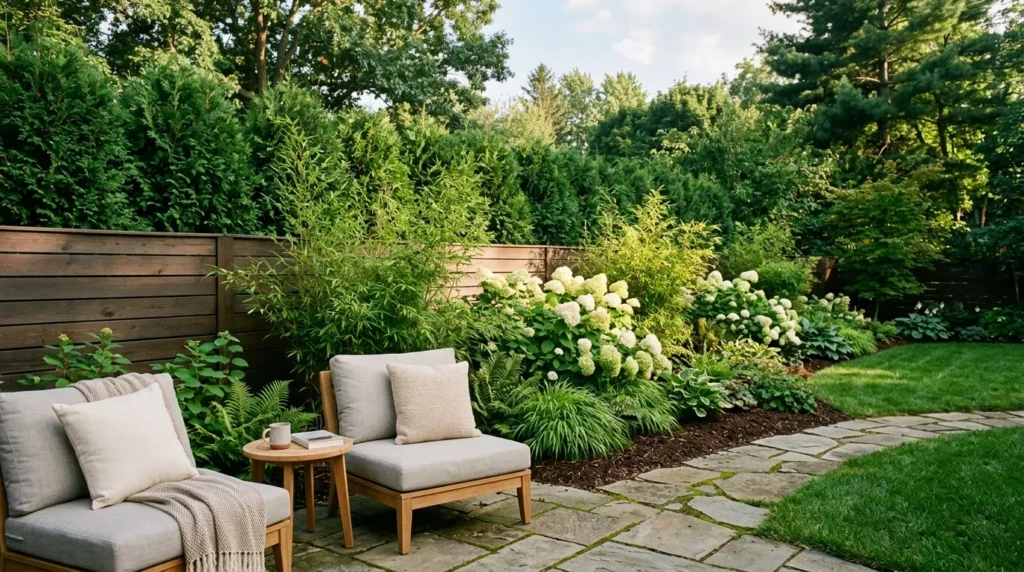
10. Privacy Planting
Bullet Points:
- Use layered greenery instead of only relying on fences, especially around patios, decks, and seating areas.
- Mix tall evergreens, medium shrubs, flowering plants, and ornamental grasses for fuller coverage.
- Choose plants based on mature size so the screen does not become overcrowded later.
- Place privacy planting where views need blocking, such as neighbors’ windows, roads, or open fence lines.
- Leave maintenance access behind or beside plants so pruning and cleanup stay manageable.
Privacy planting changes the way a backyard feels because it creates comfort without making the space look closed in. Instead of relying only on tall fences, layered plants can block views, soften noise, and add a lush backdrop for seating areas. Evergreens, ornamental grasses, hydrangeas, arborvitae, boxwood, viburnum, bamboo alternatives, and tall planters can all help shape a more private outdoor retreat. That’s why many designers recommend mixing heights rather than planting one flat row, because layers look more natural and provide better coverage in real neighborhoods today beautifully outside.
The best privacy designs begin with the exact view you want to screen. Stand in the seating area, kitchen window, or patio door and notice where your eye lands. Then place taller plants behind medium shrubs and lower perennials so the screen feels full from top to bottom. Leave enough spacing for mature growth, airflow, and maintenance access. In suburban neighborhoods, this approach can make a backyard feel calmer and more personal while still looking neighbor-friendly, polished, and inviting throughout the year with less visual exposure from nearby homes outside.
11. Smart Lighting
Bullet Points:
- Add path lights, uplights, string lights, sconces, or step lights to make the yard usable after sunset.
- Use warm white lighting instead of harsh cool light for a softer, more inviting outdoor mood.
- Light practical zones first, including walkways, steps, gates, cooking spaces, and seating areas.
- Hide fixtures where possible so the glow feels natural and the design looks clean.
- Combine solar lights for quick upgrades with low-voltage lighting for a more permanent landscape finish.
Smart lighting makes outdoor spaces feel expensive because it highlights the parts of the garden people usually miss after sunset. Path lights, uplights, step lights, string lights, wall sconces, and low spotlights can completely change the mood of a patio or yard. The goal is not to flood everything with brightness; it is to layer soft pools of light where people walk, sit, cook, and gather. Warm white bulbs usually look more flattering than harsh cool tones, especially around plants, wood, stone, and outdoor furniture in evening photos too beautifully.
A strong lighting plan starts with safety, then adds atmosphere. Light the walkway, stairs, gate, and cooking area first, then add decorative lighting around trees, planters, pergolas, or seating zones. Solar lights are simple for quick upgrades, while low-voltage systems offer a cleaner and more reliable finish for permanent landscapes. Hide fixtures where possible so the glow feels natural. When lighting is placed thoughtfully, the yard becomes usable after dinner, safer for guests, and much more beautiful from inside the home at night during every season outdoors comfortably safely too.