
How to Fix a Dripping Showerhead When the Handle Is Shut Off Tight
Dealing with a persistent leak in your bathroom is more than just a minor annoyance; it is a waste of precious resources that can drive up your monthly utility bills. If you find yourself struggling with fixing a Dripping Showerhead When the Handle Is Shut Off Tight, you are likely dealing with a degraded internal…

Dealing with a persistent leak in your bathroom is more than just a minor annoyance; it is a waste of precious resources that can drive up your monthly utility bills. If you find yourself struggling with fixing a Dripping Showerhead When the Handle Is Shut Off Tight, you are likely dealing with a degraded internal component rather than a user error. Most homeowners can resolve this issue without calling a professional plumber by identifying the specific type of faucet valve they have installed.
By replacing worn-out seals, O-rings, or cartridges, you can restore your shower to perfect working order. This process requires only a few basic hand tools and a bit of patience.
Immediate Steps for Stopping the Leak

The very first thing you must do when you notice water continuing to flow after the handle is closed is to locate the main water shut-off valve for your bathroom. In many modern homes, this is located behind an access panel near the shower, or you may need to turn off the main water supply for the entire house. Once the water is off, open the shower handle to drain any remaining pressure from the pipes.
This step is critical because it prevents accidental spraying when you begin disassembling the fixture. Neglecting to depressurize the lines often leads to a messy surprise once you loosen the valve nut.
Identifying the Valve Type
Not all shower faucets are built the same, and the internal mechanics vary significantly between manufacturers like Delta, Moen, or Kohler. Before you head to the hardware store for parts, you need to see what is happening inside your specific unit. Most shower handles are held in place by a small set screw, which is often hidden behind a decorative cap or a plastic index button.
You will likely need a hex key or a small flathead screwdriver to remove the handle and reveal the valve assembly. Taking a clear photo of the exposed valve at this stage is a smart move for reference.
Removing the Handle and Trim

After you have removed the handle, you will encounter the trim plate, also known as an escutcheon, and the underlying valve stem. Use caution here, as some older installations may have corroded screws that are prone to snapping if forced. If the screws are stuck, apply a small amount of penetrating oil and wait a few minutes before attempting to turn them again.
Once the trim is off, you should see the cartridge or the stem assembly clearly. This is the heart of the faucet where the actual water flow control happens.
Inspecting the Cartridge for Damage
The most common reason for a persistent drip is a damaged or mineral-encrusted cartridge. Over time, the rubber seals on the cartridge can harden, crack, or become coated in white mineral buildup from your local water supply. If you live in an area with hard water, this buildup often prevents the seal from seating properly against the valve body.
You can often tell if the cartridge is the culprit by looking for signs of wear on the rubber O-rings. If the O-rings look flat or brittle, they are no longer creating an airtight seal.
Using a Cartridge Puller Tool

Removing a stuck cartridge is one of the most challenging parts of the entire repair process. Because of mineral deposits, these parts can effectively “weld” themselves into the valve housing over time. If you find yourself in this situation, do not force the cartridge with pliers, as you might snap the plastic stem and complicate the job.
Instead, invest in a dedicated cartridge puller tool designed for your specific faucet brand. This tool applies even pressure to pull the cartridge straight out, which prevents damage to the delicate internal brass components of the valve body.
Cleaning Mineral Buildup and Limescale
Once the old cartridge is removed, look inside the valve body to ensure it is clean and free of debris. Mineral deposits and limescale can accumulate on the inner walls, preventing new seals from functioning correctly. You can gently scrape away large chunks of scale with a non-metallic tool to avoid scratching the brass finish.
For a deeper clean, soak a soft cloth in white vinegar and wipe the interior of the valve housing thoroughly. A clean surface is essential for the longevity of your new parts.
Comparing Replacement Options
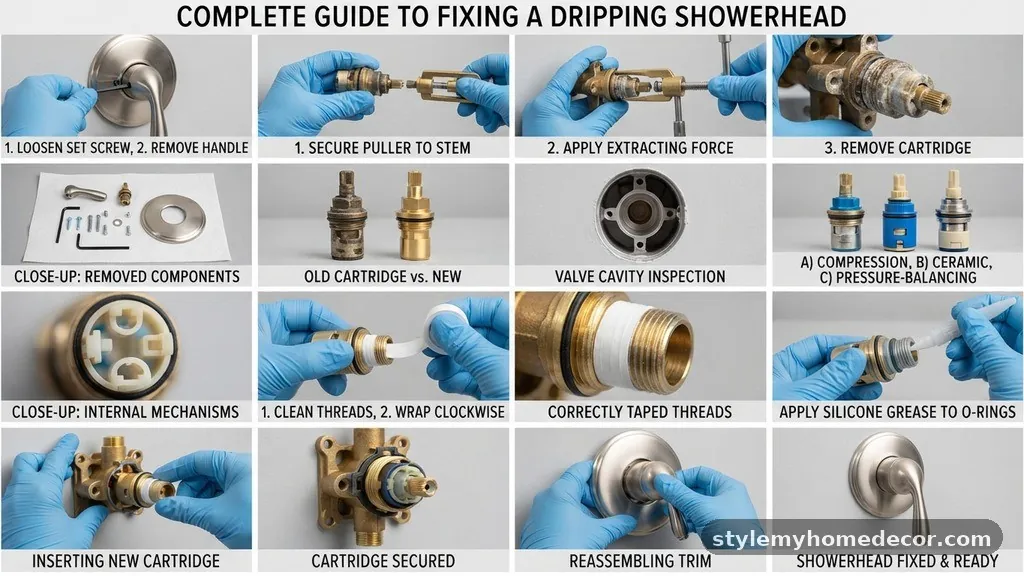
When it comes time to purchase new components, you have a few decisions to make regarding quality and compatibility. Using genuine manufacturer parts is generally recommended, as these are designed to meet the exact tolerances of your specific faucet model.
Generic “universal” parts may fit, but they are often made of lower-quality rubber that degrades faster. The following table provides a quick look at the typical components that might need replacing depending on the age and style of your shower setup.
| Component Type | Typical Lifespan | Common Failure Symptom |
|---|---|---|
| Rubber O-Ring | 3–5 Years | Slow drip from handle base |
| Plastic Cartridge | 7–10 Years | Constant drip from showerhead |
| Valve Seat/Springs | 5–8 Years | Water flow doesn’t stop fully |
Installing New Seals and O-Rings
If your shower uses a stem-style valve rather than a modern cartridge, you might only need to replace the rubber washers and seats. These are inexpensive items that can be found at any local plumbing supply store. Always bring the old parts with you to ensure you get an exact match for size and thickness.
When installing the new washer, ensure it is seated firmly in the retainer so that it does not slide out of position during the tightening process. Proper alignment is the difference between a dry showerhead and a repeat repair job.
Applying Plumber’s Tape Correctly
While most internal cartridge seals rely on rubber gaskets, some threaded connections might benefit from a small amount of plumber’s tape. Use this specifically on threads that are meant to be sealed, but be careful not to over-apply it. Excess tape can shred and clog your showerhead’s internal flow restrictor or the valve itself.
Only one or two wraps of tape are usually sufficient to create a secure connection. If you are unsure, you can find detailed guidance on proper installation techniques at the EPA WaterSense resource page regarding water efficiency.
Testing Your Work Under Pressure
Before you reinstall the handle and trim, you should test the system to ensure the leak is truly resolved. Turn the water supply back on slowly and check the area around the valve for any signs of moisture. If the drip has stopped, you can proceed to put the trim and handle back together.
It is helpful to leave the access panel open for an hour or so, just to double-check that no slow leaks develop under pressure. This extra observation period saves you from having to take the handle off again later.
- Turn off the water supply at the main valve before starting any work.
- Drain the pipes by opening the shower handle fully after shutting off the water.
- Take a photo of the valve assembly before removing any parts.
- Use a cartridge puller to avoid damaging the valve body during removal.
- Clean all mineral deposits with vinegar to ensure a smooth sealing surface.
- Replace all O-rings and washers even if they look mostly intact.
- Test the valve for leaks before reassembling the handle and trim.
Frequently Asked Questions
Why does my shower continue to drip after I have shut it off firmly?
The most likely cause is a worn-out rubber washer or a failing internal cartridge that can no longer create a watertight seal. Even if the handle feels tight, the internal components are responsible for stopping the flow, and they eventually degrade over time.
Can I fix this without turning off the main water supply?
It is highly discouraged to work on a shower valve without shutting off the water supply first. Even if the handle is turned off, the lines remain pressurized, which will result in a significant amount of water spraying out the moment you loosen the valve nut.
Do I need to replace the entire shower valve assembly?
In most cases, you do not need to replace the entire valve body, which is a major project involving cutting into your wall. Replacing the internal cartridge or the individual washers and seats is usually sufficient to stop the dripping.
How do I know which replacement cartridge to buy?
The best method is to remove the old cartridge and take it with you to the store. If that is not possible, look for a brand name or model number stamped on the shower trim or the handle base.
Is it normal for the shower handle to feel tight when turning it?
A stiff or tight handle often indicates that the internal valve parts have become heavily coated in mineral buildup or that the lubrication has dried out. Cleaning the assembly or replacing the cartridge typically restores the smooth operation of the handle.
Final Thoughts on Shower Maintenance
Fixing a Dripping Showerhead When the Handle Is Shut Off Tight is a highly manageable project that rewards you with both peace of mind and lower water usage. By systematically addressing the cartridge, seals, and mineral buildup, you extend the life of your plumbing fixture significantly. Remember that the key to a successful repair lies in preparation—depressurizing the lines and having the right tools ready makes the process much smoother.
If you encounter parts that seem fused by years of neglect, take your time with gentle cleaners and proper extraction tools rather than resorting to force. With these steps, you can confidently maintain your home and ensure your bathroom remains a functional, leak-free environment for years to come.